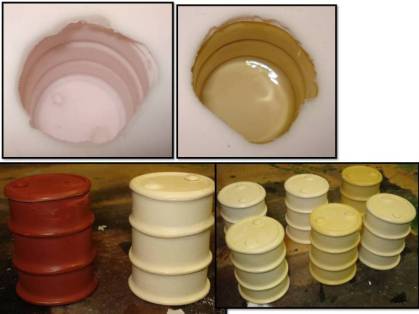
One of the things I wanted for a load was a gondola full of 55 gallon steel drums. As is common in 1/20.3 the detail items I wanted were expensive and of questionable accuracy on scale. First I had researched what the dimensions of a 55 gallon drum in 1/20.3 should be. Real drums are of standard sizes based on volume and are regulated by law so all 55 gallon drums should be the same.
I found several good examples. Here are a resin set which are spun cast so they are hollow. Very good for keeping the weight down. This is a concern with resin as it adds up fast. Also found the set next to it. Injection molded drums in 1/20 scale. They would be to small by a noticeable amount and I could only find them on E-bay in a single set of ten. I also found drums in turned aluminum. Excellent detail but heavy. It was suggested to me to check the wooden drums sold at Lowe’s. As you can see in the last pic they are way off in dimension and would have required a lot of filling and sanding to get them smooth enough to represent steel even if they did work.
In the end the cost was the biggest problem with all but the wood running more than $5 each. I guesstimated I would need 30 to 36 so the thought of paying upwards of $150 for the load was a no go.
I decided to try casting my own. I needed a master and it needed to be accurately scaled. I figured if I could find a cylinder the right diameter I could make the seams, rolling bands and bungs with a little styrene and modeling epoxy. Luck smiled upon me when a review of the junk in the garage turned up an old pool cleaning brush with a plastic handle that was within 3/8″ of the correct diameter. The hacksaw was located and cutting ensued. A few days later I had a master albeit a little on the handy craft side as my modeling skills are from expert.
You see the drum below…that is not the one I built but it was the goal.

This is the one I built. The second pic shows it in (un-primed) comparison to a 1/18 toy and a Lowe’s barrel.
With money a driver on this I did some research on the cost of buying RTV and resin. Working everything out by the cost per ounce and taking shipping and coupons into account I found that the cheapest way to get materials was to order 2 gallons (1 plastic, 1 hardener) directly from Alumilite and to buy the RTV locally with a Hobby Lobby 40% off coupon as needed. Had I bought everything locally the cost would have been about %30 higher. (priced in 2014)

I built a mold box and poured RTV. A few days later I removed the master and poured my first drum. It was a solid lump of resin and weighed a ton. To make it worse the cost was over $3 each (figuring in the cost of the RTV). I experimented with rolling the mold and in two tries produced a hollow drum open on the bottom. That brought the cost down to $.27 each and solved the weight problem…I was in business.
The process went like this. I poured about a 1/4 ounce of mixture in the bottom of the mold (this will be the top of the drum) and then used my stir stick to deform the mold by pushing down in the center of the bottom. This opened the mold for the top seam to fill and burped the air out. I had molds for other details handy and poured my extra resin into them. Once the first part cured (5 minutes) I did a second 1/4 ounce, this time I tilted the mold on its side and let the resin flow up to the edge of the rim. I gently rolled it around trying not to wear it until it set up enough to not sag. I repeated this step once more and then left the item to cure. After 10 minutes I pushed on the bottom of the mold from the outside. The drum rose up where I could grab it and pull it free.
The narrow rim of the drums concerned me and I felt I needed more surface area to glue the barrels into the gondola. I tried filling them with Great Stuff foam and then cutting off the overflow after it cured. This worked well and added no real weight or cost to the project. The first one I did in the mold thinking this would keep the drum from deforming under the pressure of the expanding foam. It was not nessacary and after that I did them all out of the mold.

On a side note. I thought other modelers might want to buy some of these so I made drums until the mold failed. I had hoped to get 50.I ended up with 97. I guess because the shape was so simple with no tight undercuts. I did sell these to some NMGR club members and a bunch on E-bay. I did them as solid casts using sections of an old wooden broom handle as filler. It worked well being inserted just as the first pour was solidifying. In 2015 I used this process on a second run to make drums for my layout where weight was not an issue.
With the drums cast I was ready to paint them. Plenty of paint schemes and products to choose from.

I want a Texaco station on my layout someday and decided the load would be motor oil being shipped in for the gas station as well as the Cibola vehicle fleet. Texaco used several different paint schemes in the years between the wars and for different products.
I also need labels. I went with a side label for the product and a head label for the company.
I primed all of the barrels white and then painted them with a final coat in a half green half white scheme. I also printed labels to glue on each one of them.
A healthy coat of Treehouse Matte clear sealed the deal.
With the drums complete I needed to get the gondola ready. The donor car for this was an Accucraft tank car I had gotten at a bargain price. I removed the tank and sent it to E-bay.

Using some extra drums I figured out how big the compartment needed to be. I glued supports into the stake pockets. On a real car this enclosure would be removable but for me it is permanent. E6K is your friend.

With the stakes dry I attached the sides. These are made of bass wood and were attached using TB3. I moved onto the ends completing the wood part of this project.
Holes were drilled in the ends and a piece of clothes hanger inserted to represent the tension rod. Ozark miniatures NBW castings hide the holes. A few dozen panel nail heads gave their lives to represent carriage bolts on the stakes. Construction complete…always a good thing.

Paint, decals, some light weathering and drums glued in.


And another project goes in the “completed” category.


You must be logged in to post a comment.