
This page will cover the building of figures that are not associated with a vehicle. I will not post a build log for all figures just those that are unique in appearance and detail or posed some difficulty in construction. For the most part these will be short quick reviews.
Saloon Girls and Cowboys
This build log will cover the kit-bashing and painting of figures for my Saloon in the town of Broken Wheel. I do not have a name for it yet nor have I built it. I will get to that later. Since I have covered the use of Milliput and the cut and pin method in other build logs this one will deal more with the concept and planning phase.
I want 5 to 7 ladies and ten or so cowboys / patrons. The saloon serves as the local whorehouse and watering hole for the drovers and livestock tenders traveling into and out of Broken Wheel. Of course nobody makes prostitutes of this era in this scale so I will have to adapt some other figures. My first figure will be the naked woman from Fun & Games figures. She comes way to naked with both her boobs and lady parts exposed. I can’t have that with the grand kids and some of my more religious friends visiting. A cover up is needed.
Here is how she looks starting out. A very attractive redhead.

I can paint her panties on but her chest will need some modeling. A corset would be period and I hope easy to do. I started by making the cincher around her waist. This was done in two parts, the front and the back. I found it impossible to keep from sticking my fingers in one side of the Milliput while doing the other. Sculpting proved pretty easy. I made a wrap of material of a uniform thickness that followed the curve of her waist and hips. Then I carved in the stay lines and lacing. Once that was dry I made the cups for the bustier and gave them some some lines as decorative seams. I think it turned out okay although I should have sanded the whole thing lightly to knock down some of the raised material. Hell what do I know about lingerie, I am just a caveman.

Next I painted the face and hair. The figure has very high cheekbones and well defined eye lines. I decided to try and give her some makeup. I went with two tone eye-shadow putting the darker color closer to the eye. I finished by adding a very shaped eyebrow in black. For her lipstick I used a dark red. She got black hair. Once I do the ink work and highlights I will give her a little rouge on the cheeks as was the style.

The first step in painting her clothing is the corset. It will be purple with lavender and black stripes on the stays.

Baggage Wagon and Porter
Several years ago I acquired a Pola baggage cart with all four wheels broken. I considered replacing them with a set from Ozark miniatures but decided it was a better course of action to put the project in a drawer and forget about it. Imagine my surprise when I pulled it out a four years later and it was still not repaired! By then I had an impressive pile of junk parts and decided to kit-bash the wheels using Flik Trix bicycle rims. These are left overs from the tires I use on the Hubley model T kits. A full description is in the guide to commercially available vehicles section.


I cut the spokes out of the center freeing both the hub and rim.Using the wheel from the bicycle model (these are the original ones that come with the bikes) the hub is removed and the outer circumference sanded lightly until it slides inside the Pola rim.A heavy bead of super glue is run around the rim joint to hold the new wheel together and fill any small gaps. To finish the Pola hub is glued over the axle hole.
With the wagon on its way to the paint shop I put part two of the project into motion: build some baggage. I wanted period items in 1/20.3 scale. In the early part of the 1900s people traveled heavy. The need for not just bulk clothing but personnel hygiene items added to the load. Throw in seasonal clothing and recreational items and a week at the in-laws looked like a moving sale. The most common luggage included:
- Steamer trunks in the form of large chests that stood on end and opened up to reveal a mini version of a wardrobe closet. Many included drawers for delicates and pigeon holes for fashion accessories and shoes.
- Hat boxes for both men and women were designed to hold either a single elaborate chapeau or multiple everyday items.
- Wooden trunks for carrying fragile household wares.
- Strong boxes and jewelry chests. Travelers needed cash money in most areas as modern banking had not yet invented credit card debt.
- Suitcases of every size and style. These were often a status symbol flaunted by the wealthy with their bags of rich and exotic leathers. Common folks used press board or cardboard covered in cloth. If in dire straights a cloth sack would be used.
- Among the more unique travel aids were; pet carriers, golf bags, gun cases and wig boxes.
I modeled a selection of all of the above examples making masters out of wood, styrene and paper. These were sprayed with a heavy coat of grey primer to stop the RTV molding material from sticking to all of the tiny pores. I have long heard of people using Legos for making their molding boxes. I acquired some from e-bay and set them up as shown. I will not use them again as many of the boxes leaked. A lot of time was spent scooping up the RTV and pouring it back into the top of the mold. I eventually got masking tape stuck on the sides which stopped the ooze until the material set-up. I will stay with the matte board boxes I had been using. Eventually usable molds were produced and vast quantities of baggage cast in resin. I thought these sets would sell on e-bay but only a few did. If I had known that I would never have made the molds and just used the masters for the project.


Painting the baggage posed a new problem. With people I do faces first, then clothing and finally feet and heads. This leaves me a place to grab hold of. With the baggage I need to paint all of the sides and the top simultaneously. I ended up drilling a hole in the bottom of each item and gluing in a paper lollipop stick with white glue. Primer was sprayed and I was on my way.
A variety of techniques were used to achieve the different colors of the many materials used in luggage. Wood was dry brushed from dark to light tones, leather with different washes and cloth as base coats with highlights. Brass, tin and iron fasteners were painted with metal flake paints and a good coat of clear gloss applied.
The clear coat gives a smooth surface for attaching the shipping documents and tourist stickers. I copied real ones from the internet and printed them on plain paper. These were glued on with white glue and then sealed with flat matte finish. Below is the baggage claim tag for my railroad along with REA and specialty shipping labels.


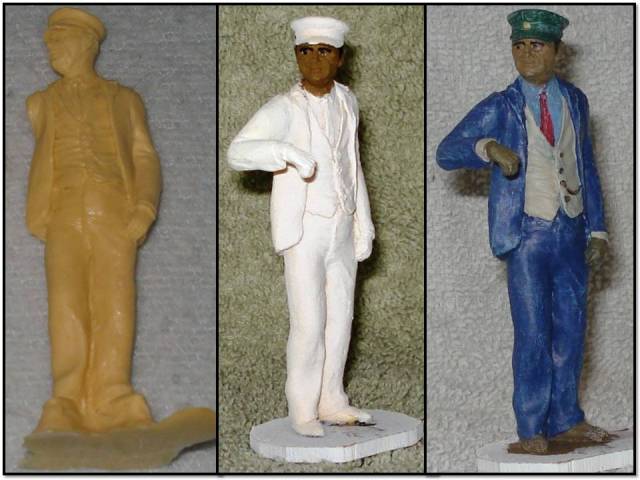
A nice pile of completed bags. For reference in size the figure is a 1/20.3 man from Supply Line. He is just over 6′ in scale. He must be well traveled as this luggage would suggest visits to many famous tourist spots across the US.

The porter figure is from Scale Humans. He is a two piece casting sold as “Guinness truck driver”. I primed him in white thinking it would make his clothing stand out more. I believe the light grey I normally use is a better choice. He is wearing the blue uniform and green hat of the Cibola line.
To finish I glued the bags on the cart in a seemingly random manner. The large steamer trunks will have to be placed on the station platform as they are too large for the cart. The porter’s arm was attached at just the right angle to have it resting on the crate.

I still need to replace the handle on the cart and build a hand truck for some other luggage but I think this turned out pretty good.

You must be logged in to post a comment.