There are a multitude of timber trestles on the layout. All are made from cedar fence pickets and or pressure treated pine. Most of these were given to me by a friend when he dismantled his layout. I am going to guess he used them for ten to fifteen years. Some were in great shape others had a few rotten timbers. All of them needed a coat of paint.
The trestles I have made are done with 1/2″ X 1/2″ timbers. Girts and sway braces are 1/2″ by 1/4″ strips.
Ohmigawd Trestle:
The biggest project I am working on is Ohmigawd trestle. To get it started I needed a trestle footing for the bridge at the top and an abutment on the mountainside. Here is the footing.
I used the three center guides on my trestle jig to form the bents. These were glued together with TB3 and then 1 3/4″ ribbed panel nails were installed with pilot holes. A small amount of nail protruded on the backside so I cut it off with a pair of dikes.
I turned the bents on their sides and glued the girts on. Once they were dry I hit them with 1″ pin nails. The girts in the center are only glued to the bents. The lateral supports were installed the same way and then pin nailed.
To finish, the supports for the bridge and trestle deck were glued on and then pin nailed from the top.
More on this as I get it done.
Pigpen Cribbing:
The inspiration.
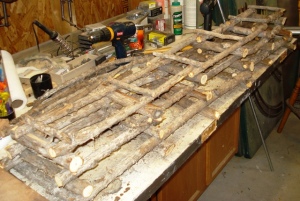
I hated building this from the start. It is made from juniper and fig limbs. Juniper is a very dirty wood to work with and both are fibrous and pitchy. Finding limbs the right size and in straight lengths took longer than assembling the item. I begin by cutting the cross pieces for the bottom and then added the first set of beams. I could not find straight limbs longer than three feet so I had to overlap them. Not to bad since this is exactly what the loggers did in real life. Glue would be useless here so I drilled pilot holes and used 1 3/4″ ribbed panel nails. These were very hard to drive in straight with the juniper. Slowly the next two levels were added.
For the deck I ran the top set of beams and then put on smaller diameter pieces. These were attached with 1″ ribbed panel nails.
To finish I filled in the deck with more small diameter pieces. A crude guard rail was added. This is where I deviated from reality. I added a pair of 1/2″ X 1/4″ strips to support the track evenly. Small spacers were inserted below these to even out the low spots. Everything was attached using 1″ pin nails. To finish I sprayed the supports black and tan to help them blend in with the wood.
It looks pretty good but it sure was a pain to build. If you are thinking of building one of these with tree limbs I suggest you get your head examined because it was no fun. That said I still need a curved section three foot long. Installation will be in The Year of Track article for July.


You must be logged in to post a comment.